Fixing the utf8mb4 issue on site migration with Backupbuddy
| Getting your Trinity Audio player ready... |
2018 Update
I wrote this post a few years back, and decided I should check in with the revised method that I’ve been using for quite awhile. The methods below should still work, but I have appended an alternate (and in my opinion, safer version of this) at the bottom of this post.
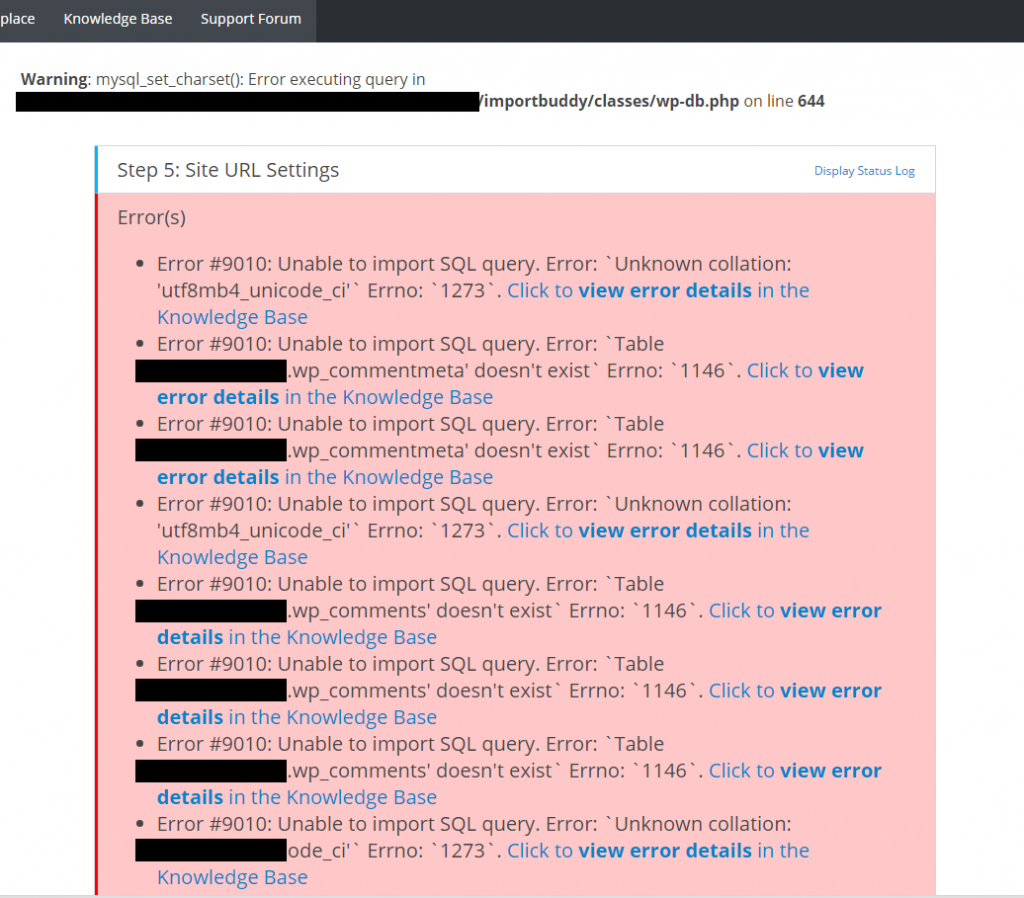
Upon migrating a site with backupbuddy, you can occasionally get “Error #9010: Unable to import SQL query. Error: Unknown collation: utf8mb4_unicode_ci Errno: 1273 or Errno: 1146”. This typically happens on WordPress migrations from localhost to the live site, though it can happen when moving a site from one server to another. This can also happen due to older shared hosting packages on hosting companies such as 1&1 or Godaddy. The good news is that there is a way around this, though it can be a bit of a pain. These instructions are for Backupbuddy in particular, though you should be able to apply a similar technique to others like Duplicator.
Converting utf8mb4 into utf8
First, a little background behind the issue:
Starting with WordPress 4.2, WordPress has moved to the utf8mb4 character set for the database. If you install version 4.2 or later, or decide to upgrade an existing install to 4.2 or later, WordPress will check if your database supports utf8mb4. If your database supports it, it will update your database tables from utf8 to utf8mb4. Support for utf8mb4 started with MySQL 5.5.3. This may cause issues for many who are currently on a hosting provider that supports utf8mb4, or a localhost install that has a MySQL version of 5.5.3 or later (which supports utf8mb4).
1. If you have a live version of the site still running, access the Dashboard or Backend of the site.
Navigate to: Backupbuddy -> Advanced Settings -> Use separate files per table (when possible) -> Make sure it’s UNCHECKED (this will force sql files into one file for easier string replacement). If you do not have a live backup, you can still proceed, though you will need to do more in Step 4.

2. Run a backup
3. Copy your Backup zip file and importbuddy.php to a folder on your computer.
4. Open the zip and copy out the sql file. It should be located in – /wp-content/uploads/backupbuddy_temp/{Random string here}/db_1.sql. If you weren’t able to force all sql files into one in Step 1, you will need to copy out all of your SQL files.
5. Find and replace all instances of “utf8mb4” with “utf8” in all of your SQL files.
6. Replace the SQL file(s) in the zip file with your new SQL file(s).
7. Pull the sql out again and double check that the new version is in there (sometimes mine doesn’t replace it properly). You should see no instances of “utf8mb4” whatsoever.
8. Upload zip and importbuddy.php to server and continue as usual.
Additional Note:
Upon installation, you might get errors when viewing the site. Open wp-config.php and verify that DB_CHARSET is set as utf8, not utf8mb4.
09/11/2018 – Updated Method
While the above method works, there are issues that can arise due to replacing utf8mb4 with utf8 (Step 5). Instead of doing this method, there’s a way to leverage PHPMyAdmin to do the work for you.
1. First, you’ll need to have the “good” database in PHPMyAdmin. This may be your localhost copy that you’re trying to migrate to your live site. If you don’t have this, you’ll need to start by importing your saved SQL file into PHPMyAdmin. If you’re using something like MAMP, WAMP, or XAMPP from anytime within the last few years, you should be fine. Just make sure the database imports successfully, and you’re good to go.
2. Navigate to PHPMyAdmin and select your Database on the left-hand side.

3. Click Export.

4. Under “Export Method” click “Custom”.
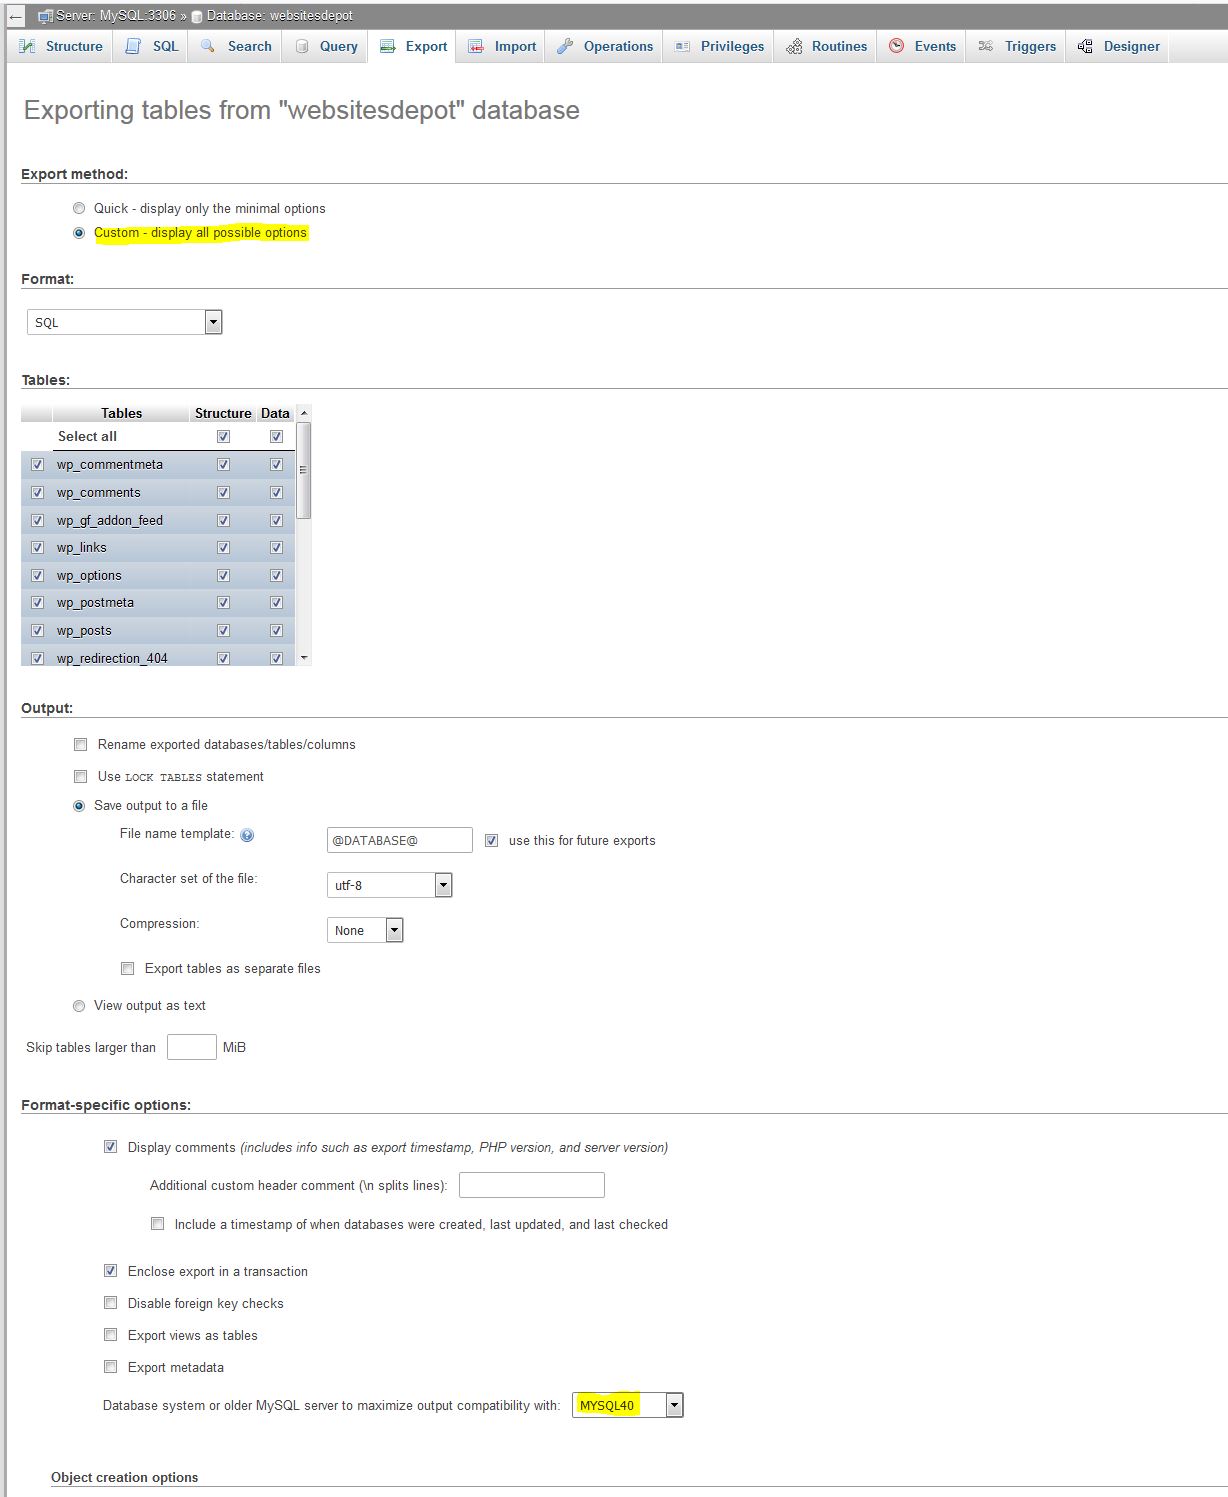
5. Under “Format-specific options:”, choose “MYSQL40” for “Database system or older MySQL server to maximize output compatibility with:”.
6. Finally, click “Go” at the bottom, and you should have a working SQL file.
7. Now for the importing part – You’ll need to make sure your live database is empty for importing, but going into your PHPMyAdmin and clearing out the new database.
8. Once the import is done, you’ll need to do the string replacements on your own, as we’re skipping BackupBuddy’s database string replacement function.
8a. Navigation to wp_options and replace the “siteurl” and “home” options with your new domain name. On newer installs, this should be #1 and #2, though older WordPress sites may have one option as #1 and the other a few pages in (typically around the #30 – #40 area, though this can be quite a bit different).

9. Login to your new website and replace the rest of your old site URLs by using the Velvet Blues, and/or Better Search Replace.